Docusaurus
Build optimized websites quickly, focus on your content | Docusaurus
快速开始
yarn create docusaurus
按要求一步步设置
运行
yarn start
部署
GitHub Pages
- 如果部署的仓库是
<用户名>.github.io,docusaurus.config.js中的baseUrl: "/"(默认) - 如果部署的仓库是
<仓库名>,docusaurus.config.js中的baseUrl: "/<仓库名>/"
自动部署在GitHub Pages上,添加action就可以了。
在 .github/workflows下添加两个文件
test-deploy:当有一个新的 pull request 被提交到主分支时,确保站点能够顺利地建立,但不会实际进行部署。
deploy:当一个 pull request 被合并到主分支或者有人直接将其推送到主分支时,它将被建立并部署到 gh-pages 分支。在这之后,新的构建输出会被发布在 GitHub Pages 网站上。
name: Deploy to GitHub Pages

on:
  push:
    branches:
      - main
    # Review gh actions docs if you want to further define triggers, paths, etc
    # https://docs.github.com/en/actions/using-workflows/workflow-syntax-for-github-actions#on

jobs:
  deploy:
    name: Deploy to GitHub Pages
    runs-on: ubuntu-latest
    steps:
      - uses: actions/checkout@v3
      - uses: actions/setup-node@v3
        with:
          node-version: 18
          cache: yarn

      - name: Install dependencies
        run: yarn install --frozen-lockfile
      - name: Build website
        run: yarn build

      # Popular action to deploy to GitHub Pages:
      # Docs: https://github.com/peaceiris/actions-gh-pages#%EF%B8%8F-docusaurus
      - name: Deploy to GitHub Pages
        uses: peaceiris/actions-gh-pages@v3
        with:
          github_token: ${{ secrets.GITHUB_TOKEN }}
          # Build output to publish to the `gh-pages` branch:
          publish_dir: ./build
          # The following lines assign commit authorship to the official
          # GH-Actions bot for deploys to `gh-pages` branch:
          # https://github.com/actions/checkout/issues/13#issuecomment-724415212
          # The GH actions bot is used by default if you didn't specify the two fields.
          # You can swap them out with your own user credentials.
          user_name: github-actions[bot]
          user_email: 41898282+github-actions[bot]@users.noreply.github.com
name: Test deployment

on:
  pull_request:
    branches:
      - main
    # Review gh actions docs if you want to further define triggers, paths, etc
    # https://docs.github.com/en/actions/using-workflows/workflow-syntax-for-github-actions#on

jobs:
  test-deploy:
    name: Test deployment
    runs-on: ubuntu-latest
    steps:
      - uses: actions/checkout@v3
      - uses: actions/setup-node@v3
        with:
          node-version: 18
          cache: yarn

      - name: Install dependencies
        run: yarn install --frozen-lockfile
      - name: Test build website
        run: yarn build
权限
需要设置Workflow的读写权限
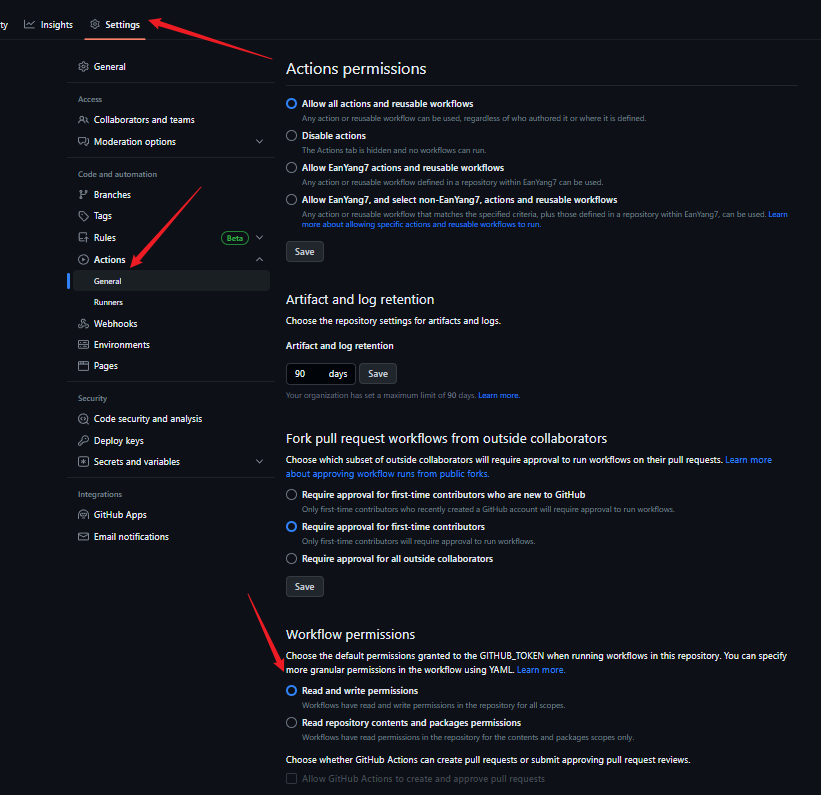
注意:如果是组织的仓库,设置中的Workflow读写权限是禁止修改的,需要在组织中的设置中进行操作
gh-pages
最后在Settings中将Pages的Branch切换为gh-pages即可
项目结构
如果您选择了经典模板并将您的网站命名为 my-website,您将在新目录 my-website/ 下看到生成的以下文件:
my-website
├── blog
│   ├── 2019-05-28-hola.md
│   ├── 2019-05-29-hello-world.md
│   └── 2020-05-30-welcome.md
├── docs
│   ├── doc1.md
│   ├── doc2.md
│   ├── doc3.md
│   └── mdx.md
├── src
│   ├── css
│   │   └── custom.css
│   └── pages
│       ├── styles.module.css
│       └── index.js
├── static
│   └── img
├── docusaurus.config.js
├── package.json
├── README.md
├── sidebars.js
└── yarn.lock
/blog/- 包含博客 Markdown 文件。如果你已禁用博客插件,你可以删除此目录,或在设置路径选项后更改其名称。更多详细信息,请参阅博客指南。/docs/- 包含文档的 Markdown 文件。在sidebars.js中自定义文档侧边栏的顺序。如果你已禁用文档插件,则可以删除此目录,或在设置路径选项后更改其名称。更多详细信息,请参阅文档指南。/src/- 非文档类文件,例如页面或自定义 React 组件。严格来说,你不一定要把非文档类文件放在这里。不过把它们放在一个集中的目录,可以让代码检查或者处理更为简便。/src/pages- 此目录中的任何 JSX/TSX/MDX 文件都将转换为网站页面。更多详细信息,请参阅页面指南。
/static/- 静态目录。此处的任何内容都将复制到最终构建目录的根目录中。/docusaurus.config.js- 包含站点配置的配置文件。这相当于 Docusaurus v1 中的 siteConfig.js。/package.json- Docusaurus 网站是一个 React 应用程序。您可以安装并使用任何 npm 包。/sidebars.js- 用于文档,指定侧边栏中文档的顺序。
单体仓库Monorepos
如果你打算用 Docusaurus 来给一个现有的项目搭建文档,单仓模式可能是一种解决方案。 单仓允许你在类似项目间共享依赖项。 比如,你的网站可以用本地的包来展示最新的功能,而不是依赖于已发布的版本; 你的贡献者也可以在实现功能时方便地更新文档。 下面是单仓模式文件夹结构的一个例子:
my-monorepo
├── package-a # 另一个包,你的项目本身
│   ├── src
│   └── package.json #  package-a 的依赖项
├── website   # Docusaurus 根目录
│   ├── docs
│   ├── src
│   └── package.json # Docusaurus 的依赖项
├── package.json # 单仓的共享依赖项
在这种情况下,您应该在 ./my-monorepo文件夹中运行 npx create-docusaurus。
如果您使用像Netlify或Vercel这样的托管提供商,则需要将站点的基本目录更改为您的Docusaurus根目录所在的位置。在这种情况下,那将是 ./website。阅读有关在部署文档中配置忽略命令的更多信息。
在Yarn文档中阅读有关monorepos的更多信息(Yarn不是设置monorepo的唯一方法,但它是一个常见的解决方案),或者查看Docusaurus 和Jest的一些实际示例。
配置
所有模板都附带一个 docusaurus.config.js,其中包括常用选项的默认值。
从高维度来说,Docusaurus 配置可被分为这几类:
对于每个可配置字段的准确引用,您可以参考docusaurus.config.js API。
站点元数据
站点元数据包含基本的全局元数据,如 title, url, baseUrl, 和 favicon。
你的站点的许多地方都会用到这些信息,比如标题、节标题、浏览器选项卡图标、社交网站信息 (Facebook, Twitter),等等。如果缺少这些信息,甚至不能生成正确的静态文件路径。
部署配置
使用deploy命令部署站点时,将使用部署配置,如 projectName、organizationName和 deploymentBranch(可选),在使用 deploy命令部署站点时使用。
建议查看部署文档以了解更多信息。
主题、插件和预设配置
分别在 themes, plugins, 和 presets字段中列出网站的themes, plugins, 以及presets。
这些通常为 npm 软件包:
module.exports = {
  // ...
  plugins: [
    '@docusaurus/plugin-content-blog',
    '@docusaurus/plugin-content-pages',
  ],
  themes: ['@docusaurus/theme-classic'],
};
没有 themes配置时就是默认使用预设主题 preset-classic
Docusaurus支持module shorthands模块简写,允许您将上述配置简化为:
module.exports = {
  // ...
  plugins: ['content-blog', 'content-pages'],
  themes: ['classic'],
};
这些模块也可以从本地目录加载:
const path = require('path');

module.exports = {
  // ...
  themes: [path.resolve(__dirname, '/path/to/docusaurus-local-theme')],
};
要指定插件或主题选项,请将配置文件的插件或主题名称替换一个二元组,包含了名称及配置选项对象:
module.exports = {
  // ...
  plugins: [
    [
      'content-blog',
      {
        path: 'blog',
        routeBasePath: 'blog',
        include: ['*.md', '*.mdx'],
        // ...
      },
    ],
    'content-pages',
  ],
};
要为绑定在预设中的插件或主题指定选项,请通过预设字段传递选项。在这个例子中, docs 指的是 @docusaurus/plugin-content-docs 并且 theme 指的是 @docusaurus/theme-classic.
module.exports = {
  // ...
  presets: [
    [
      '@docusaurus/preset-classic',
      {
        docs: {
          sidebarPath: require.resolve('./sidebars.js'),
        },
        theme: {
          customCss: [require.resolve('./src/css/custom.css')],
        },
      },
    ],
  ],
};
presets: [['classic', {...}]]也支持简写。
有关配置主题、插件和预设的进一步帮助,请参阅 使用插件.
自定义配置
Docusaurus保护 docusaurus.config.js 不受未知字段的影响。要添加自定义字段,请在 customFields中定义它们。
示例:
module.exports = {
  // ...
  customFields: {
    image: '',
    keywords: [],
  },
  // ...
};
从组件访问配置
站点中的所有组件都可以访问配置对象。 可以通过React上下文 siteConfig来访问它们。
简单示例:
import React from 'react';
import useDocusaurusContext from '@docusaurus/useDocusaurusContext';

const Hello = () => {
  const {siteConfig} = useDocusaurusContext();
  const {title, tagline} = siteConfig;

  return <div>{`${title} · ${tagline}`}</div>;
};
如果你只想在客户端使用这些字段,你可以创建自己的JS文件,并将它们作为ES6模块导入,不需要将它们放在 docusaurus.config.js中。
也就是说:
如果你有一些变量、函数、类等只在浏览器中使用,而不需要在服务器端或其他地方使用,你可以把它们写在一个单独的JS文件中,并用ES6模块的语法来导入它们。这样你就不需要把它们写在docusaurus.config.js文件中,这个文件是用来配置Docusaurus网站的一些选项的。
ES6模块是一种JavaScript的新特性,可以让我们将JavaScript代码分割成不同的文件,每个文件就是一个模块。模块可以使用import和export语句来导入和导出其他模块中的功能1。
自定义Babel配置
对于新的Docusaurus项目,我们在项目根目录中自动生成了一个 babel.config.js。
module.exports = {
  presets: [require.resolve('@docusaurus/core/lib/babel/preset')],
};
大多数情况下,这个配置已经够用了。 如果你想要自定义你的 Babel 配置(比如添加 Flow 支持),你可以直接编辑这个文件。 你需要重新启动 Docusaurus 开发服务器,更改才能生效。
Babel是一个JavaScript编译器,可以将ES6或更高版本的代码转换为ES5或更低版本的代码,以便在不支持新特性的浏览器或环境中运行。Babel也可以支持Flow,一种JavaScript的静态类型检查器。
Flow可以帮助你在JavaScript代码中添加类型注释,以便在编译时检查代码中的类型错误。Flow可以和Babel一起使用,通过
@babel/preset-flow插件来去除类型注释,生成纯净的JavaScript代码。
Navbar导航栏
接受的字段:
| 参数 | 类型 | 默认值 | 描述 |
|---|---|---|---|
title | string | undefined | 导航栏标题。 |
logo | See below | undefined | 图标对象的自定义。 |
items | NavbarItem[] | [] | 导航栏项目列表。 见下文的说明。 |
hideOnScroll | boolean | false | 当用户向下滚动时,导航栏是否隐藏。 |
style | `'primary' | 'dark'` | 与色彩模式一致 |
导航栏图标
图标可以放在静态文件夹中。图标链接的 URL 会被默认设置为网站的 base URL。 尽管你可以为图标指定自己的 URL,但如果链接是外部的,它会打开一个新标签页。 此外,你还可以覆盖图标链接的 target 属性值,如果你把文档网站托管在主网站的一个子目录中,这个配置会很有用。这种情况下,你可能不需要在链接到主网站的时候打开新标签页。
为了改善暗黑模式支持,你也可以为暗黑模式设置一个不同的图标。
接受的字段:
| 参数 | 类型 | 默认值 | 描述 |
|---|---|---|---|
alt | string | undefined | 图片的 alt 属性。 |
src | string | Required | 图片的 URL。 Base URL 会被默认添加。 |
srcDark | string | logo.src | 暗黑模式下使用的替代图像 URL。 |
href | string | siteConfig.baseUrl | 点击图标时跳转到的链接。 |
width | `string | number` | undefined |
height | `string | number` | undefined |
target | string | Calculated based on href (external links will open in a new tab, all others in the current one). | The target attribute of the link; controls whether the link is opened in a new tab, the current one, or otherwise. |
className | string | undefined | 图片的 CSS 类名。 |
style | object | undefined | 内联 CSS 样式对象。 React/JSX 风格,所有属性都是驼峰格式 (camelCase)。 |
示例配置:
docusaurus.config.js
module.exports = {
  themeConfig: {
    navbar: {
      title: '网站标题',
      logo: {
        alt: 'Site Logo',
        src: 'img/logo.svg',
        srcDark: 'img/logo_dark.svg',
        href: 'https://docusaurus.io/',
        target: '_self',
        width: 32,
        height: 32,
        className: 'custom-navbar-logo-class',
        style: {border: 'solid red'},
      },
    },
  },
};
导航栏项目
docId:默认是base—url后面的后缀(docs/后面的路径)sidebarId:在sidebar.js中创建
你可以通过向导航栏 themeConfig.navbar.items 添加项目。
module.exports = {
  themeConfig: {
    navbar: {
      items: [
        {
          type: 'doc',
          position: 'left',
          docId: 'introduction',
          label: '文档',
        },
        {to: 'blog', label: '博客', position: 'left'},
        {
          type: 'docsVersionDropdown',
          position: 'right',
        },
        {
          type: 'localeDropdown',
          position: 'right',
        },
        {
          href: 'https://github.com/facebook/docusaurus',
          position: 'right',
          className: 'header-github-link',
          'aria-label': 'GitHub 仓库',
        },
      ],
    },
  },
};
根据 type 字段,导航栏项目的行为可能不同。 下面的部分会为你介绍所有的导航栏项目类型。
导航栏链接
导航栏项目默认是一个普通链接(内部或外部均可)。
React Router 会自动给链接应用活跃样式,但在边缘情况下,你可以使用 activeBasePath。 对于链接应该在几个不同路径上激活的情况(比如你在同一个侧边栏下有多个文件夹), 你可以使用 activeBaseRegex。 activeBaseRegex 是一个比 activeBasePath 更灵活的替代选项,并且优先于后者——Docusaurus 会把它作为正则表达式解析,并与当前的 URL 匹配。
外部链接会自动获得 target="_blank" rel="noopener noreferrer" 属性。
接受的字段:
| 参数 | 类型 | 默认值 | 描述 |
|---|---|---|---|
type | 'default' | 可选 | 把这个项目的类型设置为链接。 |
label | string | 必填 | 项目显示的名称。 |
html | string | 可选 | 和 label 一样,但渲染纯 HTML 而不是文字内容。 |
to | string | 必填 | 客户端路由,用于站内导航。 会自动在开头添加 base URL。 |
href | string | 必填 | 整页导航,用于站外跳转。只能使用 to 或 href 中的一个。 |
prependBaseUrlToHref | boolean | false | 在 href 前添加 base URL。 |
position | `'left' | 'right'` | 'left' |
activeBasePath | string | to / href | 在以此路径开始的所有路由上应用活跃类样式。 通常没有必要设置。 |
activeBaseRegex | string | undefined | 如果有需要,可以替代 activeBasePath。 |
className | string | '' | 自定义 CSS 类(用于任何项目的样式)。 |
label和html不能同时存在,to和href也不能同时存在,- 除了上面的字段外,你可以指定其他任何 HTML 链接
<link>接受的属性。
示例配置:
module.exports = {
  themeConfig: {
    navbar: {
      items: [
        {
          to: 'docs/introduction',
          // Only one of "to" or "href" should be used
          // href: 'https://www.facebook.com',
          label: 'Introduction',
          // Only one of "label" or "html" should be used
          // html: '<b>Introduction</b>'
          position: 'left',
          activeBaseRegex: 'docs/(next|v8)',
          target: '_blank',
        },
      ],
    },
  },
};
导航栏下拉菜单
dropdown 类型的导航栏项有一个额外的 items 字段,一组内部的导航栏项目。
下拉菜单的内部项目只支持以下「类链接」的项目类型:
请注意下拉菜单的主项也是一个可点击的链接,所以它可以接受普通导航栏链接的任何属性。
接受的字段:
| 参数 | 类型 | 默认值 | 描述 |
|---|---|---|---|
type | 'dropdown' | 可选 | 把这个项目的类型设置为下拉菜单。 |
label | string | 必填 | 项目显示的名称。 |
items | LinkLikeItem[] | 必填 | 下拉菜单中包含的项目。 |
position | `'left' | 'right'` | 'left' |
还是可以使用 html字段
示例配置:
docusaurus.config.js
module.exports = {
  themeConfig: {
    navbar: {
      items: [
        {
          type: 'dropdown',
          label: '社区',
          position: 'left',
          items: [
            {
              label: 'Facebook',
              href: 'https://www.facebook.com',
            },
            {
              type: 'doc',
              label: '社交',
              docId: 'social',
            },
            // ... more items
          ],
        },
      ],
    },
  },
};
导航栏文档链接
如果你想要链接到某篇指定文档,这个特别的导航栏项目类型会渲染一个链接,指向带有给定的 docId 的文档。 只要你在浏览同一侧边栏的文档,它就会获得 navbar__link--active 类名。
接受的字段:
| 参数 | 类型 | 默认值 | 描述 |
|---|---|---|---|
type | 'doc' | 必填 | 把这个项目的类型设置为文档链接。 |
docId | string | 必填 | 这个项目链接到的文档的 ID。 |
label | string | docId | 项目显示的名称。 |
position | `'left' | 'right'` | 'left' |
docsPluginId | string | 'default' | 这篇文档所属的文档插件的 ID。 |
示例配置:
module.exports = {
  themeConfig: {
    navbar: {
      items: [
        {
          type: 'doc',
          position: 'left',
          docId: 'introduction',
          label: '文档',
        },
      ],
    },
  },
};
导航栏文档侧边栏链接
你可以将一个导航栏项目链接到某个给定侧边栏的第一个文档链接(可能是文档或者生成类别索引),而不需要硬编码一个文档 ID。
接受的字段:
| 参数 | 类型 | 默认值 | 描述 |
|---|---|---|---|
type | 'docSidebar' | 必填 | 把这个项目的类型设置为侧边栏链接。 |
sidebarId | string | 必填 | 这个项目链接到的侧边栏的 ID。 |
label | string | 第一个文档链接的侧边栏标签 | 项目显示的名称。 |
position | `'left' | 'right'` | 'left' |
docsPluginId | string | 'default' | 这个侧边栏所属的文档插件的 ID。 |
如果你的侧边栏经常更新而且顺序不稳定,请使用这个导航栏项目类型。
示例配置:
module.exports = {
  themeConfig: {
    navbar: {
      items: [
        {
          type: 'docSidebar',
          position: 'left',
          sidebarId: 'api',
          label: 'API',
        },
      ],
    },
  },
};
module.exports = {
  tutorial: [
    {
      type: 'autogenerated',
      dirName: 'guides',
    },
  ],
  api: [
    'cli', // 导航栏项会链接到这篇文档
    'docusaurus-core',
    {
      type: 'autogenerated',
      dirName: 'api',
    },
  ],
};
导航栏文档版本下拉菜单
如果你使用文档版本化,这个特别的导航栏项目类型会渲染一个下拉菜单,包含你的网站的所有可用版本。
用户可以从一个版本切换到另一个版本。 而仍然保持在同一篇文档上(只要文档 ID 在版本之间保持不变)。
接受的字段:
| 参数 | 类型 | 默认值 | 描述 |
|---|---|---|---|
type | 'docsVersionDropdown' | 必填 | 把这个项目的类型设置为文档版本下拉菜单。 |
position | `'left' | 'right'` | 'left' |
dropdownItemsBefore | LinkLikeItem[] | [] | 在下拉菜单开头添加额外的项目。 |
dropdownItemsAfter | LinkLikeItem[] | [] | 在下拉菜单结尾添加额外的项目。 |
docsPluginId | string | 'default' | 这个版本下拉菜单所属的文档插件的 ID。 |
dropdownActiveClassDisabled | boolean | false | 不要在浏览文档时添加链接活跃类名。 |
示例配置:
module.exports = {
  themeConfig: {
    navbar: {
      items: [
        {
          type: 'docsVersionDropdown',
          position: 'left',
          dropdownItemsAfter: [{to: '/versions', label: '所有版本'}],
          dropdownActiveClassDisabled: true,
        },
      ],
    },
  },
};
导航栏文档版本
如果你使用文档版本化,这个特别的的导航栏项目类型会链接到你的文档的活跃版本(正浏览的版本;取决于当前的 URL)。如果没有版本处于活跃状态,则链接到最新版本。
接受的字段:
| 参数 | 类型 | 默认值 | 描述 |
|---|---|---|---|
type | 'docsVersion' | 必填 | 把这个项目的类型设置为文档版本链接。 |
label | string | 活跃/最新版本的标签。 | 项目显示的名称。 |
to | string | 活跃/最新版本。 | 项目指向的内部链接。 |
position | `'left' | 'right'` | 'left' |
docsPluginId | string | 'default' | 这个版本下拉菜单所属的文档插件的 ID。 |
示例配置:
module.exports = {
  themeConfig: {
    navbar: {
      items: [
        {
          type: 'docsVersion',
          position: 'left',
          to: '/path',
          label: '标签',
        },
      ],
    },
  },
};
导航栏语言下拉菜单
如果您使用i18n功能,这种特殊的导航栏项目类型将呈现一个下拉列表,其中包含您网站的所有可用区域设置。
用户能够从一种语言切换到另一种语言,同时保持在同一个页面上。
接受的字段:
| 参数 | 类型 | 默认值 | 描述 |
|---|---|---|---|
type | 'localeDropdown' | 必填 | 把这个项目的类型设置为语言下拉菜单。 |
position | `'left' | 'right'` | 'left' |
dropdownItemsBefore | LinkLikeItem[] | [] | 在下拉菜单开头添加额外的项目。 |
dropdownItemsAfter | LinkLikeItem[] | [] | 在下拉菜单结尾添加额外的项目。 |
示例配置:
module.exports = {
  themeConfig: {
    navbar: {
      items: [
        {
          type: 'localeDropdown',
          position: 'left',
          dropdownItemsAfter: [
            {
              to: 'https://my-site.com/help-us-translate',
              label: '帮助我们翻译',
            },
          ],
        },
      ],
    },
  },
};
导航栏搜索框
如果您使用搜索,搜索栏将是导航栏中最右边的元素。
然而,通过这个特别的导航栏项目类型,你可以更改默认位置。
| 参数 | 类型 | 默认值 | 描述 |
|---|---|---|---|
type | 'search' | 必填 | 把这个项目的类型设置为搜索框。 |
position | `'left' | 'right'` | 'left' |
className | string | / | 项目的自定义 CSS 类名。 |
docusaurus.config.js
module.exports = {
  themeConfig: {
    navbar: {
      items: [
        {
          type: 'search',
          position: 'right',
        },
      ],
    },
  },
};
导航栏自定义 HTML 项目
你也可以用这个导航栏项目类型在导航栏中渲染自己的 HTML 标记。
| 参数 | 类型 | 默认值 | 描述 |
|---|---|---|---|
type | 'html' | 必填 | 把这个项目的类型设置为 HTML 元素。 |
position | `'left' | 'right'` | 'left' |
className | string | '' | 项目的自定义 CSS 类名。 |
value | string | '' | 在这个项目中渲染的自定义 HTML。 |
module.exports = {
  themeConfig: {
    navbar: {
      items: [
        {
          type: 'html',
          position: 'right',
          value: '<button>提交反馈</button>',
        },
      ],
    },
  },
};
自动隐藏顶部导航栏
你可以启用这个很酷的界面功能,它会在用户开始向下滚动页面时,自动隐藏导航栏,当用户向上滚动时再显示它。
module.exports = {
  themeConfig: {
    navbar: {
      hideOnScroll: true,
    },
  },
};
导航栏样式
你可以把导航栏样式设置为静态,而不禁用主题切换功能。 无论用户选择哪个主题,所选的样式都会被应用。
目前有两种样式选项:dark 和 primary(基于 --ifm-color-main 的颜色)。 你可以在 Infima 文档中看到样式的预览。
docusaurus.config.js
module.exports = {
  themeConfig: {
    navbar: {
      style: 'primary',
    },
  },
};
文档docs
文档功能允许用户以层级格式组织编排 Markdown 文件
查看Docs Plugin API Reference文档以获取选项的详尽列表。
只支持 md和 mdx,不支持 js页面
网站的文档从低到高有四层组织架构:
- 独立页面。
- 侧边栏。
- 版本。
- 插件实例。
仅文档模式
新创建的 Docusaurus 网站会有这样的结构:
example.com/                                -> 生成自 `src/pages/index.js`

example.com/docs/intro                      -> 生成自 `docs/intro.md`
example.com/docs/tutorial-basics/...        -> 生成自 `docs/tutorial-basics/...`
...

example.com/blog/2021/08/26/welcome         -> 生成自 `blog/2021-08-26-welcome/index.md`
example.com/blog/2021/08/01/mdx-blog-post   -> 生成自 `blog/2021-08-01-mdx-blog-post.mdx`
...
所有文档都会放在 docs/子路由下。 但是如果您的网站只有文档,或者您想要将文档放在根目录上来优先排序。
假设你的配置中包含以下内容:
module.exports = {
  // ...
  presets: [
    '@docusaurus/preset-classic',
    {
      docs: {
        /* 文档插件配置 */
      },
      blog: {
        /* 博客插件配置 */
      },
      // ...
    },
  ],
};
要进入仅文档模式,可以把它改成类似这样:
module.exports = {
  // ...
  presets: [
    '@docusaurus/preset-classic',
    {
      docs: {
        // 高亮下一行
        routeBasePath: '/', // 把文档放在网络根目录
        /* 其他文档插件配置 */
      },
      blog: false, // 可选:禁用博客插件
      // ...
    },
  ],
};
注意您不一定非要放弃使用博客或其他插件;设置 routeBasePath: '/' 所产生的效果就是把文档从 https://example.com/docs/some-doc 移到了根目录:https://example.com/some-doc。 如果启用了博客,还是可以通过 blog/ 子路由访问到它。
别忘了通过添加前言Font Matter把某个页面放置在网站顶部 (https://example.com/):
---
slug: /
---

这一页会是用户访问 https://example.com/ 时出现的主页。
如果你用 slug: / 把某篇文档变成了主页,你就需要删掉 src/pages/index.js 的现有首页,否则会有两个文件会映射到同一个路径!
现在,网站的结构会长得像这样:
example.com/                       - 生成自 `docs/intro.md`
example.com/tutorial-basics/...    - 生成自 `docs/tutorial-basics/...`
...
Docusaurus 2 中还存在 ”仅博客模式“。 你可以用类似上述的方法实现。 遵循仅博客模式上的设置说明。
创建Doc
创建名为 greeting.md 的 Markdown 文件,把它放在 docs 目录下。
website # 你的网站的根目录
├── docs
│   └── greeting.md
├── src
│   └── pages
├── docusaurus.config.js
├── ...
----
description: 创建一个内容丰富的文档页面。
---

## 来自 Docusaurus 的问候

你准备好为你的开源项目创建文档网站了吗?

## 标题

会显示在右上方的目录

这样,你的用户不用通读全文就可以知晓这篇文章的主要内容。

## 目录默认只包括 h2 和 h3 标题。

你可以在每个文档或主题配置中设置目录包含的标题层级。

标题会保持恰当的间距,让文章看起来层级清晰。

- lists will help you
- present the key points
- that you want your users to remember
  - and you may nest them
    - multiple times
在 docs 目录下所有带有下划线(_)前缀的文件都会被当作页面「片段」,并被默认忽略。
你可以阅读更多关于导入页面片段的内容。
front matter文档前言
front matter用于为文档页面提供额外的元数据。前言是可选的——Docusaurus 能够自行推断所有必要的元数据,无需前言。 例如,下面介绍的doc tags功能需要使用front matter。有关所有可能的字段,请参阅API文档。
Doc tags
您可以选择向文档页面添加标签,这将引入除文档侧边栏之外的另一个分类维度。在文档导言中,像这么声明一个标签列表:
---
id: doc-with-tags
title: 一篇包含标签的文档
tags:
  - 演示
  - 开始上手
---
标签也可以用 tags: [演示, 开始上手] 的语法定义。
你也可以阅读更多关于所有的 Yaml 数组声明语法的内容。
接受的字段
| 参数 | 类型 | 默认值 | 描述 |
|---|---|---|---|
id | string | 文件路径(包括文件夹,不含扩展名) | 文档的唯一 ID。 |
title | string | Markdown title or id | 你的文档使用的文本标题。 用于页面元数据和多个地方的备用值(侧边栏、下篇/上篇按钮……)。 如果 Markdown 内容没有标题,它会被自动添加到你的文档顶部。 |
pagination_label | string | sidebar_label or title | 这篇文档在上一篇/下一篇按钮中显示的文本 |
sidebar_label | string | title | 这篇文档在侧边栏中显示的文本 |
sidebar_position | number | 默认排序 | 控制使用 autogenerated 的边栏项时文档在生成的侧栏切片中的位置。另请参见自动生成的侧边栏元数据Autogenerated sidebar metadata. |
sidebar_class_name | string | undefined | 在使用自动生成侧边栏时,给相应的侧边栏标签一个特殊类名。 |
sidebar_custom_props | object | undefined | 将自定义属性custom props 分配给引用此文档的侧边栏项 |
displayed_sidebar | string | undefined | 强制浏览当前文档时显示给定的侧边栏。有关详细信息,请阅读多个侧边栏指。multiple sidebars guide |
hide_title | boolean | false | 是否隐藏文档顶部显示的标题。 此选项只会隐藏前言中定义的标题,对于 Markdown 文档顶部的标题没有任何影响。 |
hide_table_of_contents | boolean | false | 是否隐藏右侧的文档目录。 |
toc_min_heading_level | number | 2 | 目录中显示的最小标题层级。 必须介于 2 到 6 之间,并且小于等于最大值。 |
toc_max_heading_level | number | 3 | 目录中显示的最大标题层级。 必须介于 2 和 6。 |
pagination_next | `string | null` | 侧边栏的下一个文档 |
pagination_prev | `string | null` | 侧边栏的上一个文档 |
parse_number_prefixes | boolean | numberPrefixParser plugin option | 是否禁用本文档的数字前缀解析。 See alsoUsing number prefixes. |
custom_edit_url | string | Computed using the editUrl plugin option | 编辑此文档时要跳转到的 URL。 |
keywords | string[] | undefined | 用于搜索引擎优化的文档关键词元标签。 |
description | string | Markdown 正文的第一行 | 文档描述,将成为 <head>中的 <meta name="description" content="..."/> 和 <meta property="og:description" content="..."/>, 由搜索引擎使用。 |
image | string | undefined | 显示文档链接时所用的缩略图或封面。 |
slug | string | 文件路径 | 允许自定义文档URL(/<routeBasePath>/<slug>). 支持多种模式:slug: my-doc, slug: /my/path/myDoc, slug: /. |
tags | Tag[] | undefined | 一个包含两个字符串字段(标签 label 和永久链接 permalink)的字符串或对象列表,用于标记您的文档。 |
draft | boolean | false | 一个布尔值,表明文档处于未完成状态。 文档草稿只会在开发模式下显示。 |
last_update | FileChange | undefined | 允许覆盖最后更新的作者、日期。 Date can be anyparsable date string. |
type Tag = string | {label: string; permalink: string};
type FileChange = {date: string; author: string};
示例:
---
id: doc-markdown
title: 文档 Markdown 特性
hide_title: false
hide_table_of_contents: false
sidebar_label: Markdown
sidebar_position: 3
pagination_label: Markdown 特性
custom_edit_url: https://github.com/facebook/docusaurus/edit/main/docs/api-doc-markdown.md
description: 我解决不了这个问题时在哪里找到你
keywords:
  - docs
  - docusaurus
image: https://i.imgur.com/mErPwqL.png
slug: /myDoc
last_update:
  date: 1/1/2000
  author: 自定义作者名
---

# Markdown 特性

我的 Markdown 文档的内容
组织文件夹结构
Markdown文件在 docs文件夹下的排列方式可能会对Docusaurus内容的生成产生多种影响。然而,其中绝大多数可以与文件结构脱钩。
文档 ID
每个文档均有唯一的 id(标识符)。 默认情况下,文档 id 是文件相对文档根目录的路径(不包括后缀)。
例如,greeting.md 的 ID 是 greeting,而 guide/hello.md 的 ID 则是 guide/hello。
website # 你的网站的根目录
└── docs
   ├── greeting.md
   └── guide
      └── hello.md
但是,用户可以在前言中指定 id 的最后一部分。 举个例子,如果 guide/hello.md 的内容为如下所示,其最终的 id 则为 guide/part1。
---
id: part1
---

Lorem ipsum
当手写侧边栏,或这使用与文档相关的布局或钩子时,ID 会被用来指代某篇文档。
文档 URL
文档的 URL 路径默认为它相对于 docs 文件夹的路径。 你可以用 slug 前言来更改文档的 URL。
比如,假设你的网站结构长得像这样:
website # 你的网站的根目录
└── docs
    └── guide
        └── hello.md
默认情况下,hello.md 可以在 /docs/guide/hello 处访问。 你也可以把它的 URL 位置修改为 /docs/bonjour:
---
slug: /bonjour
---

Lorem ipsum
slug 会被添加到文档插件的 routeBasePath 后面。routeBasePath 默认是 /docs。 有关如何从URL中删除/Docs部分的信息,请参阅仅文档模式。
你可以使用:
- 绝对路径:
slug: /mySlug、slug: /... - 相对路径:
slug: mySlug、slug: ./../mySlug...
如果你想要让一篇文档位于网站根部下,有形如 https://docusaurus.io/docs/ 的路径,那么你可以这么填写前言中的 slug:
---
id: my-home-doc
slug: /
---

Lorem ipsum
侧边栏
当使用自动生成的边栏时,文件结构将决定边栏结构。
我们关于文件系统组织的建议是:让你的文件系统和侧边栏结构保持一致(这样你就不需要手写你的 sidebars.js 文件),并使用 slug 前言来自定义每个文档的 URL。
侧边栏
创建侧边栏可以:
- 分组多篇相关文档
- 在每篇文档旁显示侧边栏
- 提供下一篇/上一篇按钮的分页导航
要在你的 Docusaurus 网站上使用侧边栏,只需两步:
- 定义一个导出一组侧边栏对象的文件。
- 直接将此对象传入
@docusaurus/plugin-docs或通过@docusaurus/preset-classic传入。
module.exports = {
  presets: [
    [
      '@docusaurus/preset-classic',
      {
        docs: {
          sidebarPath: require.resolve('./sidebars.js'),
        },
      },
    ],
  ],
};
默认侧边栏
如果未指定 sidebarPath,Docusaurus会使用 docs文件夹的文件系统结构自动生成一个侧边栏:
module.exports = {
  mySidebar: [
    {
      type: 'autogenerated',
      dirName: '.', // 为 docs 目录(或者 versioned_docs/<version>)生成侧边栏
    },
  ],
};
你也可以显式定义你的侧边栏。
侧边栏项目
侧边栏简单来说就是由一些类别、文档链接、其他超链接组成的层级结构。
type Sidebar =
  // 普通语法
  | SidebarItem[]
  // 简写语法
  | {[categoryLabel: string]: SidebarItem[]};
举个例子:
module.exports = {
  mySidebar: [
    {
      type: 'category',
      label: 'Getting Started',
      items: [
        {
          type: 'doc',
          id: 'doc1',
        },
      ],
    },
    {
      type: 'category',
      label: 'Docusaurus',
      items: [
        {
          type: 'doc',
          id: 'doc2',
        },
        {
          type: 'doc',
          id: 'doc3',
        },
      ],
    },
    {
      type: 'link',
      label: 'Learn more',
      href: 'https://example.com',
    },
  ],
};
这是一个导出了一个叫做 mySidebar 的侧边栏的文件。 它有三个顶层项目:两个类别和一个外部链接。 每个类别内部都有几个文档链接。
一个边栏文件可以包含多个边栏对象,由它们的对象键标识。
type SidebarsFile = {
  [sidebarID: string]: Sidebar;
};
项目类别
- Doc: 文档页面的链接,并和侧边栏绑定
- Link:内部或外部页面链接
- Category:创建侧边栏项下拉菜单
- Autogenerated: 自动生成侧边栏
- HTML:在这个位置渲染纯 HTML
- Ref: 指向文档页面的链接,而不让项目参与导航生成
Doc - 文档链接
使用 doc 类型链接至文档页面,并分配链接文档至侧边栏。
Link - 任意页面链接
使用 link 类型链接到任何非文档的页面(内部或外部链接)。
HTML - 渲染自定义标记
使用 html 类型在项目的 <li> 标签中渲染自定义 HTML。
适用于插入自定义项目,比如分割线、节标题、广告、图片。
Category - 创建分类层级
使用 category 类型创建侧边栏项的层次结构。
主题配置
可隐藏侧边栏
启用 themeConfig.docs.sidebar.hideable 选项后,你可以使整个侧边栏变得可隐藏,让用户能够更好地关注内容。 这对于中等屏幕大小(如平板)的读者来说格外有用。
module.exports = {
  themeConfig: {
    docs: {
      sidebar: {
        hideable: true,
      },
    },
  },
};
自动折叠侧边栏类别
themeConfig.docs.sidebar.autoCollapseCategories 选项会在扩展一个类别时折叠所有的同级类别。 这能让用户免于打开过多的菜单,帮助他们关注选定的部分。
module.exports = {
  themeConfig: {
    docs: {
      sidebar: {
        autoCollapseCategories: true,
      },
    },
  },
};
传递自定义属性
要将自定义道具传递到侧边栏项目,请将可选的 customProps对象添加到任何项目中。这对于通过快速渲染React组件呈现侧边栏项目来应用站点自定义非常有用。
{
  type: 'doc',
  id: 'doc1',
  customProps: {
    badges: ['new', 'green'],
    featured: true,
  },
};
侧边栏面包屑导航
面包屑导航默认会在页面顶端渲染。它用的是当前页面的「侧边栏路径」。
这个行为可以用插件选项禁用:
module.exports = {
  presets: [
    [
      '@docusaurus/preset-classic',
      {
        docs: {
          breadcrumbs: false,
        },
      },
    ],
  ],
};
复杂侧边栏示例
来自 Docusaurus 网站的真实例子:
const sidebars = {
  docs: [
    'introduction',
    {
      type: 'category',
      label: 'Getting Started',
      link: {
        type: 'generated-index',
      },
      collapsed: false,
      items: [
        'installation',
        'configuration',
        'playground',
        'typescript-support',
      ],
    },
    {
      type: 'category',
      label: 'Guides',
      link: {
        type: 'generated-index',
        title: 'Docusaurus Guides',
        description:
          "Let's learn about the most important Docusaurus concepts!",
        keywords: ['guides'],
        image: '/img/docusaurus.png',
      },
      items: [
        'guides/creating-pages',
        {
          type: 'category',
          label: 'Docs',
          link: {
            type: 'doc',
            id: 'guides/docs/introduction',
          },
          items: [
            'guides/docs/create-doc',
            {
              type: 'category',
              label: 'Sidebar',
              link: {
                type: 'doc',
                id: 'guides/docs/sidebar/index',
              },
              items: [
                'guides/docs/sidebar/items',
                'guides/docs/sidebar/autogenerated',
                'guides/docs/sidebar/multiple-sidebars',
              ],
            },
            'guides/docs/versioning',
            'guides/docs/multi-instance',
          ],
        },
        'blog',
        {
          type: 'category',
          label: 'Markdown Features',
          link: {
            type: 'doc',
            id: 'guides/markdown-features/introduction',
          },
          items: [
            'guides/markdown-features/react',
            'guides/markdown-features/tabs',
            'guides/markdown-features/code-blocks',
            'guides/markdown-features/admonitions',
            'guides/markdown-features/toc',
            'guides/markdown-features/assets',
            'guides/markdown-features/links',
            'guides/markdown-features/plugins',
            'guides/markdown-features/math-equations',
            'guides/markdown-features/diagrams',
            'guides/markdown-features/head-metadata',
          ],
        },
        'styling-layout',
        'swizzling',
        'static-assets',
        'search',
        'browser-support',
        'seo',
        'using-plugins',
        'deployment',
        {
          type: 'category',
          label: 'Internationalization',
          link: {type: 'doc', id: 'i18n/introduction'},
          items: [
            {
              type: 'doc',
              id: 'i18n/tutorial',
              label: 'Tutorial',
            },
            {
              type: 'doc',
              id: 'i18n/git',
              label: 'Using Git',
            },
            {
              type: 'doc',
              id: 'i18n/crowdin',
              label: 'Using Crowdin',
            },
          ],
        },
        'guides/whats-next',
      ],
    },
    {
      type: 'category',
      label: 'Advanced Guides',
      link: {type: 'doc', id: 'advanced/index'},
      items: [
        'advanced/architecture',
        'advanced/plugins',
        'advanced/routing',
        'advanced/ssg',
        'advanced/client',
      ],
    },
    {
      type: 'category',
      label: 'Migrating from v1 to v2',
      items: [
        'migration/migration-overview',
        'migration/migration-automated',
        'migration/migration-manual',
        'migration/migration-versioned-sites',
        'migration/migration-translated-sites',
      ],
    },
  ],
  api: [
    'cli',
    'docusaurus-core',
    {
      type: 'autogenerated',
      dirName: 'api',
    },
  ],
};
module.exports = sidebars;
标题优先级
sidebar_label(font matter)>正文标题(必须是一级标题)>id(font matter)>md文件名
自动生成侧边栏
Docusaurus 可以根据你的文件系统结构自动生成侧边栏:每个文件夹会生成一个类别,每个文件会生成一个文档链接。
type SidebarItemAutogenerated = {
  type: 'autogenerated';
  dirName: string; // 生成侧边栏切片的源文件夹(相对文档目录)
};
Docusaurus 可以从你的 docs 文件夹中自动生成整个侧边栏:
module.exports = {
  myAutogeneratedSidebar: [
    {
      type: 'autogenerated',
      dirName: '.', // '.' 即当前的文档文件夹
    },
  ],
};
Docusaurus将 autogenerated项目转换为侧边栏切片sidebar slice (也在类别shorthands中讨论):doc或 category类型的项目列表,因此您可以在一个侧边栏级别中拼接多个目录中的多个自动生成 autogenerated 项目,将它们与常规侧边栏项目交错。
类别索引惯例
Docusaurus 可以自动给一个类别关联一篇索引文档。
类别索引文档的文件名符合下列条件之一:
- 名为
index(大小写不敏感):docs/Guides/index.md - 名为
README(大小写不敏感):docs/Guides/README.mdx - 和上一级目录的名字一致:
docs/Guides/Guides.md
把引言文档命名为
README.md,可以在 GitHub 上浏览此目录的时候显示这篇文档;用index.md则会更加接近服务器发送 HTML 文件的行为。如果一个文件夹只有一个索引页,它会变成一个链接,而不是一个类别。 这对于把资源和文档并置很有用:
some-doc
├── index.md
├── img1.png
└── img2.png
然后在index.md文档中插入卡片列表
在文档页面中嵌入生成索引
卡片列表
通过 DocCardList 组件,在普通的文档页中也嵌入自动生成的卡片列表。 它会显示当前文档所属类别的所有侧边栏项目。

一般放在类别目录下的索引页面 index.md中
import DocCardList from '@theme/DocCardList';

<DocCardList />
也可以指定一个类别的 id。
mport DocCardList from '@theme/DocCardList';

<DocCardList category="tutorial" />
简介由各子文档的前言字段 description决定(没有就是正文第一段)
生成索引页
你可以自动生成一个索引页,显示此类别的所有直接子项。 slug 允许你自定义生成页面的路径,默认为 /category/[类别名]。
module.exports = {
  docs: [
    {
      type: 'category',
      label: '教程',
      link: {
        type: 'generated-index',
        title: 'Docusaurus 教程',
        description: '学习最重要的 Docusaurus 概念!',
        slug: '/category/docusaurus-guides',
        keywords: ['guides'],
        image: '/img/docusaurus.png',
      },
      items: ['pages', 'docs', 'blog', 'search'],
    },
  ],
};
在 Docusaurus 教程页上看看它的效果。
- 用
generated-index链接来快速生成介绍文档。 - 嵌入索引适用于侧边栏
type: 'autogenerated'(放在类别目录下的index.md中),生成索引页适用于侧边栏type: 'category'
成索引页适用于侧边栏
type: 'category',在sidebar.js和类别文件夹中的_category_.yml都要设置一下link: {
type: "generated-index",
title: "Docusaurus 教程",
description: "学习最重要的 Docusaurus 概念!",
slug: "/category/docusaurus-guides",
keywords: ["guides"],
image: "/img/docusaurus.png",
}因为
sidebar.js只用于进入文档单独侧边栏时的索引页面而
_category_.yml只用于type: "docSidebar"在侧边栏选择类别目录时的索引页面提示选择
_category_.yml而不选择_category_.json是因为yml既可以注释,又方便直接把sidebar.js中的代码格式拷贝过来
自动生成侧边栏元数据
对于手写的侧边栏定义,你会通过 sidebars.js 给每个项目提供元数据;对于自动生成的侧边栏,Docusaurus 会从项目对应的文件中读取。 除此之外,你还可能想要调整每个项目之间的相对位置,因为默认情况下,同一个侧边栏切片里的项目会根据文件和文件夹名字,按字母表顺序生成。
自动生成后可以通过元数据调整位置
文档项目元数据
label、className、customProps 属性在前言中声明,对应的字段分别是 sidebar_label、sidebar_class_name、sidebar_custom_props。 相对位置可以用一样的方法声明,也就是 sidebar_position 前言。
---
sidebar_position: 2
sidebar_label: 简单
sidebar_class_name: green
---

# 简单教程

这里是简单教程!
类别元数据
在类别相对应的文件夹里新建一个 _category_.json 或 _category_.yml 文件。 你可以声明类别所需要的任何元数据,以及 position 元数据。 如果类别有文档索引链接,label、className、position、customProps 会默认为此文档的对应元数据值。
{
  "position": 2.5,
  "label": "教程",
  "collapsible": true,
  "collapsed": false,
  "className": "red",
  "link": {
    "type": "generated-index",
    "title": "教程总览"
  },
  "customProps": {
    "description": "这个描述可以用在 swizzle 的 DocCard 里"
  }
}
以用小数来表示类别的位置,这样可以在不改变其他类别位置的情况下,插入一个新的类别。
举个例子,如果你有三个类别,它们的 position 分别是 1, 2, 3,那么它们会按照这个顺序显示在侧边栏中。如果你想在第一个和第二个类别之间插入一个新的类别,你可以给它一个 position 为 1.5,这样就不用修改其他类别的 position 了。
使用数字前缀
有一种简单的给自动生成侧边栏排序的方法,就是给每个文档和文件夹添加一个数字前缀。这会让它们在文件系统按文件名排序时也是有序的:
docs
├── 01-Intro.md
├── 02-Tutorial Easy
│   ├── 01-First Part.md
│   ├── 02-Second Part.md
│   └── 03-End.md
├── 03-Tutorial Advanced
│   ├── 01-First Part.md
│   ├── 02-Second Part.md
│   ├── 03-Third Part.md
│   └── 04-End.md
└── 04-End.md
为了更方便使用此功能,Docusaurus 支持多种数字前缀模式。
默认情况下,Docusaurus 会从文档 ID、标签及 URL 路径中移除数字前缀。
使用多个侧边栏
你可以为每组想要分类到一起的 Markdown 文件创建一个侧边栏。
考虑这个例子:
module.exports = {
  tutorialSidebar: {
    '分类 A': ['doc1', 'doc2'],
  },
  apiSidebar: ['doc3', 'doc4'],
};
当浏览 doc1 或者 doc2 时,tutorialSidebar 会被显示;当浏览 doc3 或者 doc4 时,apiSidebar 会被显示。
理解侧边栏绑定
沿用上面的例子,如果有一篇 commonDoc 被同时包含在了两个侧边栏里:
module.exports = {
  tutorialSidebar: {
    '分类 A': ['doc1', 'doc2', 'commonDoc'],
  },
  apiSidebar: ['doc3', 'doc4', 'commonDoc'],
};
Docusaurus 该怎么知道在浏览 commonDoc 的时候展示哪个侧边栏呢? 答案是:它不知道,我们也不能保证它会选哪个侧边栏。
当你在侧边栏甲中添加一篇文档乙的时候,会创建一个双向绑定:侧边栏甲会包含一个指向乙的链接,并且当浏览乙的时候,甲会被显示。 但是有时候,我们会想要解除这两重绑定关系中的一重。比如:
- 怎么在侧边栏甲中生成一个文档乙的链接,但不要在浏览乙的时候显示甲?比如,当我像上文的例子一样,有若干个侧边栏都包含了文档乙的时候,我希望能明确告诉 Docusaurus 显示其中某个侧边栏?
- 怎么在浏览文档乙的时候显示侧边栏甲,但甲不包含乙的链接?比如,如果乙是「文档总览页」,而侧边栏这时候只是用来导航的?
前言的 displayed_sidebar 字段会强制设置侧边栏的绑定。 继续用上文的例子,你仍然可以用简写形式,不需要任何特别配置:
module.exports = {
  tutorialSidebar: {
    '分类 A': ['doc1', 'doc2'],
  },
  apiSidebar: ['doc3', 'doc4'],
};
然后加一段前言:
---
displayed_sidebar: apiSidebar
---
这会显式地告诉 Docusaurus,在浏览 commonDoc 的时候,显示 apiSidebar。 用同样的方法,你可以让不包含文档乙的侧边栏甲在文档乙上显示:
---
displayed_sidebar: tutorialSidebar
---
即便 tutorialSidebar 不包含指向 home 的链接,tutorialSidebar 还是会在浏览 home 的时候显示。
如果你设置了 displayed_sidebar: null,这一页就不会显示任何侧边栏了,因此也不会有分页导航了。
生成分页导航
Docusaurus 会用侧边栏信息,在每一页文档的末尾生成「下一页」和「上一页」的导航链接。 它严格地使用当前显示的侧边栏:如果没有绑定的侧边栏,它也不会生成分页导航。 然而,链接到的「下一篇」和「上一篇」文档并不保证会显示相同的侧边栏:它们被包含在了这个侧边栏里,但它们的前言里可能有另一个 displayed_sidebar。
如果一个侧边栏是因为设置了 displayed_sidebar 前言而被显示的,而侧边栏并不包含这个文档本身,那么也不会显示分页导航。
你可以用 pagination_next 和 pagination_prev 自定义分页导航。 考虑这个侧边栏:
module.export =
  教程:[
    '导语',
    {
      安装: ['windows', 'linux', 'macos'],
    },
    '上手',
  ],
};
"windows" 页面上的分页链接会指向 "linux",但这没有意义:你应该想让读者在安装完毕后继续阅读「上手」。 在这种情况下,你可以手动设置分页导航:
---
pagination_next: 上手
---

# Windows 安装
你也可以用 pagination_next: null 或者 pagination_prev: null 禁用分页链接。
分页链接的标签默认为侧边栏标签。 你可以用 pagination_label 前言自定义这篇文档应该如何在分页链接中显示。
ref 项目
The ref type is identical to the doc type in every way, except that it doesn't participate in generating navigation metadata. 它只会注册一个链接。 在生成分页和显示侧边栏时,ref 项目会被完全忽略。
当你想要从若干个侧边栏链接到同一篇文档时,ref 会很有用。 文档只会属于一个侧边栏(那个它以 type: 'doc' 形式出现的侧边栏,或者包含在自动生成目录里),但它的链接会出现在所有包含了它的侧边栏里。
考虑这个例子:
module.exports = {
  tutorialSidebar: {
    'Category A': [
      'doc1',
      'doc2',
      {type: 'ref', id: 'commonDoc'},
      'doc5',
    ],
  },
  apiSidebar: ['doc3', 'doc4', 'commonDoc'],
};
}
你可以把 ref 类型看做是同时做了下面两件事:
- 为
commonDoc设置了displayed_sidebar: tutorialSidebar(因为ref会在侧边栏绑定时被忽略) - 为
doc2设置了pagination_next: doc5,同时为doc5设置了pagination_prev: doc2(因为ref会在生成分页导航时被忽略)
plugin-content-docs
提供文档功能,是Docusaurus的默认文档插件。
yarn add @docusaurus/plugin-content-docs
If you use the preset @docusaurus/preset-classic, you don't need to install this plugin as a dependency.
你可以通过预设选项来配置这个插件。
接受的字段:
| 参数 | 类型 | 默认值 | 描述 |
|---|---|---|---|
path | string | 'docs' | 文档内容目录的文件系统路径,相对于站点目录。 |
editUrl | `string | EditUrlFunction` | undefined |
editLocalizedFiles | boolean | false | 编辑 URL 会指向本地化的文件,而不是原始的未翻译文件。 Ignored when editUrl is a function. |
editCurrentVersion | boolean | false | 编辑 URL 会永远指向当前版本文档而不是历史版本。 Ignored when editUrl is a function. |
routeBasePath | string | 'docs' | 站点文档部分的 URL 前缀。DO NOT include a trailing slash. Use / for shipping docs without base path. |
tagsBasePath | string | 'tags' | 站点标签列表部分的 URL 前缀。 It is prepended to the routeBasePath. |
include | string[] | ['**/*.{md,mdx}'] | 相对于内容路径的 glob 模式列表,匹配到的 Markdown 文件会被构建。 |
exclude | string[] | See example configuration | Glob 模式列表,匹配到的 Markdown 文件会被排除。 Serves as refinement based on the include option. |
sidebarPath | `false | string` | undefined |
sidebarCollapsible | boolean | true | 侧边栏类别是否默认可折叠。 See alsoCollapsible categories |
sidebarCollapsed | boolean | true | 侧边栏类别是否默认被折叠。 See alsoExpanded categories by default |
sidebarItemsGenerator | SidebarGenerator | Omitted | Function used to replace the sidebar items of type 'autogenerated' with real sidebar items (docs, categories, links...). See also Customize the sidebar items generator |
numberPrefixParser | `boolean | [PrefixParser`](https://docusaurus.io/zh-CN/docs/api/plugins/@docusaurus/plugin-content-docs#PrefixParser) | Omitted |
docLayoutComponent | string | '@theme/DocPage' | 每个文档页面的根布局组件。 提供了版本的数据 context,不会在切换文档时卸载。 |
docItemComponent | string | '@theme/DocItem' | 文档主容器,包括了目录、页面导航等。 |
docTagsListComponent | string | '@theme/DocTagsListPage' | 标签列表页的根组件 |
docTagDocListComponent | string | '@theme/DocTagDocListPage' | 「包含某标签的所有文档」页面的根组件。 |
docCategoryGeneratedIndexComponent | string | '@theme/DocCategoryGeneratedIndexPage' | 自动生成类别索引页的根组件。 |
remarkPlugins | any[] | [] | 传递给 MDX 的 Remark 插件。 |
rehypePlugins | any[] | [] | 传递给 MDX 的 Rehype 插件。 |
beforeDefaultRemarkPlugins | any[] | [] | 在 Docusaurus 默认 Remark 插件之前传递给 MDX 的自定义 Remark 插件。 |
beforeDefaultRehypePlugins | any[] | [] | 在 Docusaurus 默认 Rehype 插件之前传递给 MDX 的自定义 Rehype 插件。 |
showLastUpdateAuthor | boolean | false | 是否显示最后更新文档的作者。 |
showLastUpdateTime | boolean | false | 是否显示最后更新文档的时间。 |
breadcrumbs | boolean | true | 在文档页面上启用或禁用面包屑导航。 |
disableVersioning | boolean | false | 即使存在多个版本,也明确禁用分版功能。 这会让网站只包含当前版本。 Will error if includeCurrentVersion: false and disableVersioning: true. |
includeCurrentVersion | boolean | true | 包含文档的当前版本。 |
lastVersion | string | First version in versions.json | 文档类的导航栏项会默认显示并跳转到的文档版本。 |
onlyIncludeVersions | string[] | 所有版本 | 只包含所有可用版本中的一个子集。 |
versions | VersionsConfig | {} | 独立自定义每个版本的属性。 |
module.exports = {
  presets: [
    [
      '@docusaurus/preset-classic',
      {
        docs: {
          path: 'docs',
          breadcrumbs: true,
          // Simple use-case: string editUrl
          // editUrl: 'https://github.com/facebook/docusaurus/edit/main/website/',
          // Advanced use-case: functional editUrl
          editUrl: ({versionDocsDirPath, docPath}) =>
            `https://github.com/facebook/docusaurus/edit/main/website/${versionDocsDirPath}/${docPath}`,
          editLocalizedFiles: false,
          editCurrentVersion: false,
          routeBasePath: 'docs',
          include: ['**/*.md', '**/*.mdx'],
          exclude: [
            '**/_*.{js,jsx,ts,tsx,md,mdx}',
            '**/_*/**',
            '**/*.test.{js,jsx,ts,tsx}',
            '**/__tests__/**',
          ],
          sidebarPath: 'sidebars.js',
          async sidebarItemsGenerator({
            defaultSidebarItemsGenerator,
            numberPrefixParser,
            item,
            version,
            docs,
            isCategoryIndex,
          }) {
            // Use the provided data to generate a custom sidebar slice
            return [
              {type: 'doc', id: 'intro'},
              {
                type: 'category',
                label: 'Tutorials',
                items: [
                  {type: 'doc', id: 'tutorial1'},
                  {type: 'doc', id: 'tutorial2'},
                ],
              },
            ];
          },
          numberPrefixParser(filename) {
            // Implement your own logic to extract a potential number prefix
            const numberPrefix = findNumberPrefix(filename);
            // Prefix found: return it with the cleaned filename
            if (numberPrefix) {
              return {
                numberPrefix,
                filename: filename.replace(prefix, ''),
              };
            }
            // No number prefix found
            return {numberPrefix: undefined, filename};
          },
          docLayoutComponent: '@theme/DocPage',
          docItemComponent: '@theme/DocItem',
          remarkPlugins: [require('remark-math')],
          rehypePlugins: [],
          beforeDefaultRemarkPlugins: [],
          beforeDefaultRehypePlugins: [],
          showLastUpdateAuthor: false,
          showLastUpdateTime: false,
          disableVersioning: false,
          includeCurrentVersion: true,
          lastVersion: undefined,
          versions: {
            current: {
              label: 'Android SDK v2.0.0 (WIP)',
              path: 'android-2.0.0',
              banner: 'none',
            },
            '1.0.0': {
              label: 'Android SDK v1.0.0',
              path: 'android-1.0.0',
              banner: 'unmaintained',
            },
          },
          onlyIncludeVersions: ['current', '1.0.0', '2.0.0'],
        },
      },
    ],
  ],
};
页面pages
不会像docs下的文件一样自动创建侧边栏
plugin-content-pages
@docusaurus/plugin-content-pages 插件允许你创建独立页面,比如案例展示页面、实时演示页面,或是支持页面。 你可以使用 React 组件,或是 Markdown。
查看Pages Plugin API Reference文档以获取选项的详尽列表。
路由
在 /src/pages/ 目录下所创建的任何 JavaScript 和Markdown文件都会自动转换为网页,网站结构与 /src/pages/ 的目录结构一致。 举个例子:
src/pages/index.js→localhost:3000/src/pages/foo.md→localhost:3000/foosrc/pages/foo/bar.js→localhost:3000/foo/bar
在这个基于组件的开发时代,我们鼓励你把样式、标记、行为都放在一个组件中。 每个页面都是组件。如果你需要使用样式自定义页面设计,我们推荐你把样式和页面组件共同放在独立的目录下。 举个例子,如果你要创建「support」页面,你可以在下面两种方式中选择一种:
- 新建一个
/src/pages/support.js文件 - 新建
/src/pages/support/目录及/src/pages/support/index.js文件
我们推荐后者,这样你可以把和页面相关的文件都放在这个文件夹里。 比如说仅用于「support」页面的 CSS 模块文件 (styles.module.css)。
- 这只是推荐的项目结构。你仍需要在组件模块 (
support/index.js) 里手动导入 CSS 模块文件。
默认情况下,以 _ 开头的任何 Markdown 或 Javascript 文件都会被忽略,也不会为其生成任何路由(参见 exclude 选项)。
my-website
├── src
│   └── pages
│       ├── styles.module.css
│       ├── index.js
│       ├── _ignored.js
│       ├── _ignored-folder
│       │   ├── Component1.js
│       │   └── Component2.js
│       └── support
│           ├── index.js
│           └── styles.module.css
.
Docusaurus 会自动为 src/pages/ 内的所有 JavaScript/TypeScript 文件生成相应的网站路径。 如果你想要在这个文件夹中创建可复用的组件,请使用 exclude 选项(默认情况下,以 _ 开头的文件、测试文件 (.test.js) 和 __tests__ 目录内的文件不会被转换成页面)。
重复路由
你可能会不小心创建映射到同一路由的多个页面。 发生这种情况时,Docusaurus 会在运行 yarn start 或 yarn build 时提醒你存在重复路由,但此时网站仍然能构建成功。 你只能访问最后创建的页面,而其他的冲突页面会被覆盖。 要解决此问题,你需要编辑或移除重复的路由。
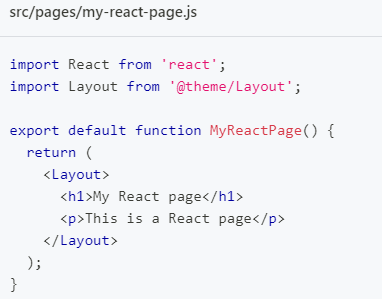
React.js
import React from 'react';
import Layout from '@theme/Layout';

export default function MyReactPage() {
  return (
    <Layout>
      <h1>My React page</h1>
      <p>This is a React page</p>
    </Layout>
  );
}
页面显示在 http://localhost:3000/my-react-page。
- 每个页面均没有样式。 如果你想要显示导航栏、页脚等,需要从
@theme/Layout中导入Layout组件,然后把你的内容用这个组件包裹。 - 也可以创建扩展名为
.tsx的 TypeScript 组件 (helloReact.tsx),同样.jsx也可以。
MD
自动解析文件夹下的
index.md比如
src/pages/test/index.mdhttp://localhost:3000/test/
.md文件都会默认解析为文档的布局
- 在
.md文件中插入react组件会自动按照MDX解析 - Markdown 不如 React 页面灵活,因为它总是会用主题布局。
MDX
在 Markdown 页面中发挥 React 的全部功能,所以 MDX 文档。
和 .md文件一样都会默认解析为文档的布局。
例如:
export const Highlight = ({ children, color }) => (
  <span
    style={{
      backgroundColor: color,
      borderRadius: "2px",
      color: "#fff",
      padding: "0.2rem",
    }}
  >
    {children}
  </span>
);

<Highlight color="#25c2a0">Docusaurus green</Highlight> and <Highlight color="#1877F2">
  Facebook blue
</Highlight> are my favorite colors.

I can write **Markdown** alongside my _JSX_!
博客blog
Docusaurus 为每篇博客文章创建一个页面,还有一个博客索引页面,一个标签系统,一个 RSS 订阅源...
创建文章
---
slug: greetings
title: Greetings!
authors:
  - name: Joel Marcey
    title: Co-creator of Docusaurus 1
    url: https://github.com/JoelMarcey
    image_url: https://github.com/JoelMarcey.png
  - name: Sébastien Lorber
    title: Docusaurus maintainer
    url: https://sebastienlorber.com
    image_url: https://github.com/slorber.png
tags: [greetings]
---

Congratulations, you have made your first post!

Feel free to play around and edit this post as much you like.
A new blog post is now available at http://localhost:3000/blog/greetings.
markdown
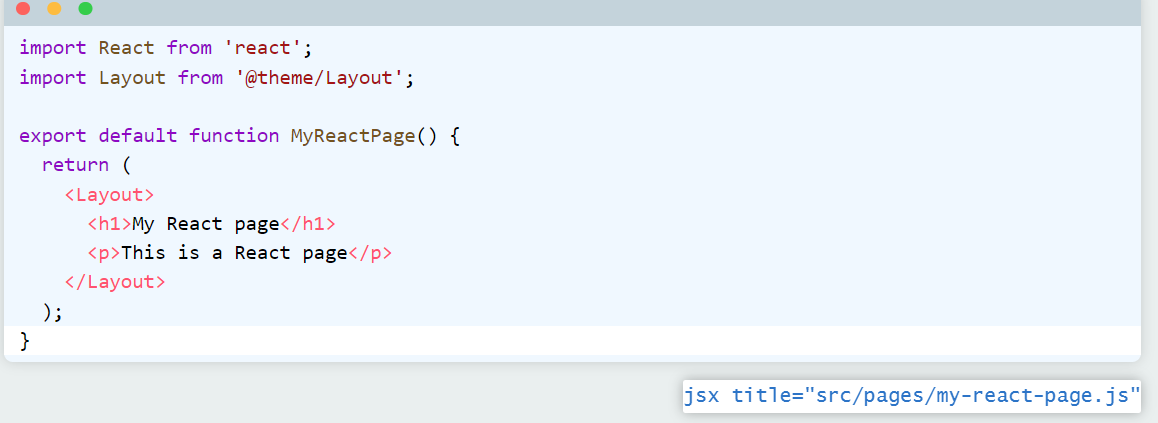
代码
如果要显示代码文件名,加上 title
import React from 'react';
import Layout from '@theme/Layout';

export default function MyReactPage() {
  return (
    <Layout>
      <h1>My React page</h1>
      <p>This is a React page</p>
    </Layout>
  );
}
Markdown文件在顶部有称为 Front Matter的元数据:
---
id: my-doc-id
title: My document title
description: My document description
slug: /my-custom-url
---

## Markdown heading

Markdown text with [links](./hello.md)
slug可以设置网址的后缀
Links
Regular Markdown links are supported, using url paths or relative file paths.
Let's see how to [Create a page](/create-a-page).
Let's see how to [Create a page](./create-a-page.md).
Result: Let's see how to Create a page.
Images
Regular Markdown images are supported.
You can use absolute paths to reference images in the static directory (static/img/docusaurus.png):


You can reference images relative to the current file as well. This is particularly useful to colocate images close to the Markdown files using them:

忠告Admonitions
Docusaurus有一个特殊的语法来创建警告和标注:
:::tip My tip

Use this awesome feature option

:::

:::danger Take care

This action is dangerous

:::

Use this awesome feature option
This action is dangerous
MDX and React Components
MDX 可以使你的文档更具有交互性,并允许在 Markdown 中使用任何 React 组件:
export const Highlight = ({children, color}) => (
  <span
    style={{
      backgroundColor: color,
      borderRadius: '20px',
      color: '#fff',
      padding: '10px',
      cursor: 'pointer',
    }}
    onClick={() => {
      alert(`You clicked the color ${color} with label ${children}`)
    }}>
    {children}
  </span>
);

This is <Highlight color="#25c2a0">Docusaurus green</Highlight> !

This is <Highlight color="#1877F2">Facebook blue</Highlight> !
HTML标签
<font>
虽然html5中已经弃用了.但这里面还是可以使用。
size
<font size="10">字体大小</font>
<font size="10">字体大小</font>
color
<font color="red">字体颜色</font>
<font color="red">字体颜色</font>
搜索
- 首先申请注册DocSearch: Search made for documentation | DocSearch by Algolia
- 在
docusaurus.config.js添加algolia字段
module.exports = {
  // ...
  themeConfig: {
    // ...
    algolia: {
      // Algolia 提供的应用 ID
      appId: 'YOUR_APP_ID',

      //  公开 API 密钥:提交它没有危险
      apiKey: 'YOUR_SEARCH_API_KEY',

      indexName: 'YOUR_INDEX_NAME',

      // 可选:见下文
      contextualSearch: true,

      // 可选:声明哪些域名需要用 window.location 型的导航而不是 history.push。 适用于 Algolia 配置会爬取多个文档站点,而我们想要用 window.location.href 在它们之间跳转时。
      externalUrlRegex: 'external\\.com|domain\\.com',

      // Optional: Replace parts of the item URLs from Algolia. Useful when using the same search index for multiple deployments using a different baseUrl. You can use regexp or string in the `from` param. For example: localhost:3000 vs myCompany.com/docs
      replaceSearchResultPathname: {
        from: '/docs/', // or as RegExp: /\/docs\//
        to: '/',
      },

      // Optional: Algolia search parameters
      searchParameters: {},

      // Optional: path for search page that enabled by default (`false` to disable it)
      searchPagePath: 'search',

      //... other Algolia params
    },
  },
};
然后去algolia官网找到上面必须的3个参数
appId、apiKey和indexNameSettings | Crawler Admin Console (algolia.com)在settings中可以看到
appId和apiKey和indexName(就是Project Name)提示可以直接使用这里的
apiKey,但是不推荐,因为这里的apiKey权限很高,而且文档和是公开的,不安全。algolia有提供可以公开的,只供搜索的apiKey,在API Keys | Algolia可以看到Search API Key,作为apiKeyCrawler Admin Console (algolia.com),可以不用管,使用默认的,但推荐使用algolia专门为Docusaurus提供的模板。
- 填上appId和apiKey(这里的apiKey使用权限最高的那个)
- 替换其中的4个
YOUR_WEBSITE_URL和2个YOUR_INDEX_NAME即可
Docusaurus 搭建new Crawler({
  appId: 'YOUR_APP_ID',
  apiKey: 'YOUR_API_KEY',
  rateLimit: 8,
  maxDepth: 10,
  startUrls: ['https://YOUR_WEBSITE_URL/'],
  sitemaps: ['https://YOUR_WEBSITE_URL/sitemap.xml'],
  ignoreCanonicalTo: true,
  discoveryPatterns: ['https://YOUR_WEBSITE_URL/**'],
  actions: [
    {
      indexName: 'YOUR_INDEX_NAME',
      pathsToMatch: ['https://YOUR_WEBSITE_URL/**'],
      recordExtractor: ({ $, helpers }) => {
        // priority order: deepest active sub list header -> navbar active item -> 'Documentation'
        const lvl0 =
          $(
            '.menu__link.menu__link--sublist.menu__link--active, .navbar__item.navbar__link--active'
          )
            .last()
            .text() || 'Documentation';

        return helpers.docsearch({
          recordProps: {
            lvl0: {
              selectors: '',
              defaultValue: lvl0,
            },
            lvl1: ['header h1', 'article h1'],
            lvl2: 'article h2',
            lvl3: 'article h3',
            lvl4: 'article h4',
            lvl5: 'article h5, article td:first-child',
            lvl6: 'article h6',
            content: 'article p, article li, article td:last-child',
          },
          indexHeadings: true,
          aggregateContent: true,
          recordVersion: 'v3',
        });
      },
    },
  ],
  initialIndexSettings: {
    YOUR_INDEX_NAME: {
      attributesForFaceting: [
        'type',
        'lang',
        'language',
        'version',
        'docusaurus_tag',
      ],
      attributesToRetrieve: [
        'hierarchy',
        'content',
        'anchor',
        'url',
        'url_without_anchor',
        'type',
      ],
      attributesToHighlight: ['hierarchy', 'content'],
      attributesToSnippet: ['content:10'],
      camelCaseAttributes: ['hierarchy', 'content'],
      searchableAttributes: [
        'unordered(hierarchy.lvl0)',
        'unordered(hierarchy.lvl1)',
        'unordered(hierarchy.lvl2)',
        'unordered(hierarchy.lvl3)',
        'unordered(hierarchy.lvl4)',
        'unordered(hierarchy.lvl5)',
        'unordered(hierarchy.lvl6)',
        'content',
      ],
      distinct: true,
      attributeForDistinct: 'url',
      customRanking: [
        'desc(weight.pageRank)',
        'desc(weight.level)',
        'asc(weight.position)',
      ],
      ranking: [
        'words',
        'filters',
        'typo',
        'attribute',
        'proximity',
        'exact',
        'custom',
      ],
      highlightPreTag: '<span class="algolia-docsearch-suggestion--highlight">',
      highlightPostTag: '</span>',
      minWordSizefor1Typo: 3,
      minWordSizefor2Typos: 7,
      allowTyposOnNumericTokens: false,
      minProximity: 1,
      ignorePlurals: true,
      advancedSyntax: true,
      attributeCriteriaComputedByMinProximity: true,
      removeWordsIfNoResults: 'allOptional',
      separatorsToIndex: '_',
    },
  },
});
Algolia参数
Search API Parameters Reference | Algolia
文件夹名一定要是中文的,不然生成的sitemap.xml中的路径就是乱码,algolia就会搜索不到
问题
可以索引整个docusaurus根文件夹下的文档。主要是靠algolia的Crawler爬取/sitemap.xml上内容。
但是却不能搜索超链接的内容,看看有没有解决方法(考虑把超链接加入到sitemap.xml里)
疑问
docusaurus.config.js中的type注释
比如
/** @type {import('@docusaurus/types').Config} */
/** @type {import('@docusaurus/preset-classic').ThemeConfig} */
这是两个用JSDoc语法写的类型注释,表示这个对象的类型是Docusaurus配置对象。
type注释允许类型检查和ide补全
中文路径
文件夹和文档绝对不能出现中文,否则build生成的sitemap.xml会出现乱码导致algolia搜索不到。但是UI界面需要中文,所有就需要在文件夹的_category_.yml中使用label设置中文名,但此时路由路径就会变为中文,所以还需要设置link字段的slug来设置为英文路由